1.什么是NTP服务器
NTP服务器是一种网络时间协议服务器,它是运行在传输层123号端口的 UDP 协议,用于同步计算机网络上的时钟。NTP服务器可以提供高精度的时间服务,使得计算机网络中的所有计算机都能够同步到相同的时间。
NTP服务器通常使用一组可靠的时钟源,如GPS、原子钟或其他NTP服务器,以提供高精度的时间服务。NTP服务器可以在内部网络中部署,也可以在互联网上提供公共时间服务。
NTP服务器的工作原理是通过与其他NTP服务器进行通信来确定正确的时间,并将其传递给网络中的其他计算机。NTP服务器使用时钟漂移算法来逐步调整时钟,使其与参考时钟保持同步。NTP服务器可以提供精确的时间同步服务,这对于需要在计算机网络中精确地协调事件的应用程序非常重要,如金融交易、科学研究、工业自动化等。
总之,NTP服务器是一种非常重要的网络服务,它可以确保计算机网络中的所有计算机都具有相同的时间,并提供高精度的时间同步服务。
2.服务端与客户端规划
服务类型 主机名 IP地址
服务端(NTP服务器) ntp 192.168.250.198
客户端 mysvn 192.168.250.206
3.安装和配置 NTP 守护进程
官方 CentOS /RHEL 7 库默认提供 NTP 服务器安装包,可以通过使用下面的命令安装。
3.1安装NTP服务器
官方 CentOS /RHEL 7 库默认提供 NTP 服务器安装包,可以通过使用下面的命令安装。
root@shadow ~# yum install ntp
已加载插件:fastestmirror, langpacks
Loading mirror speeds from cached hostfile
- base: mirrors.huaweicloud.com
- extras: mirrors.huaweicloud.com
- updates: mirrors.ustc.edu.cn
正在解决依赖关系
--> 正在检查事务
---> 软件包 ntp.x86_64.0.4.2.6p5-29.el7.centos.2 将被安装
3.2选择服务器国家位置
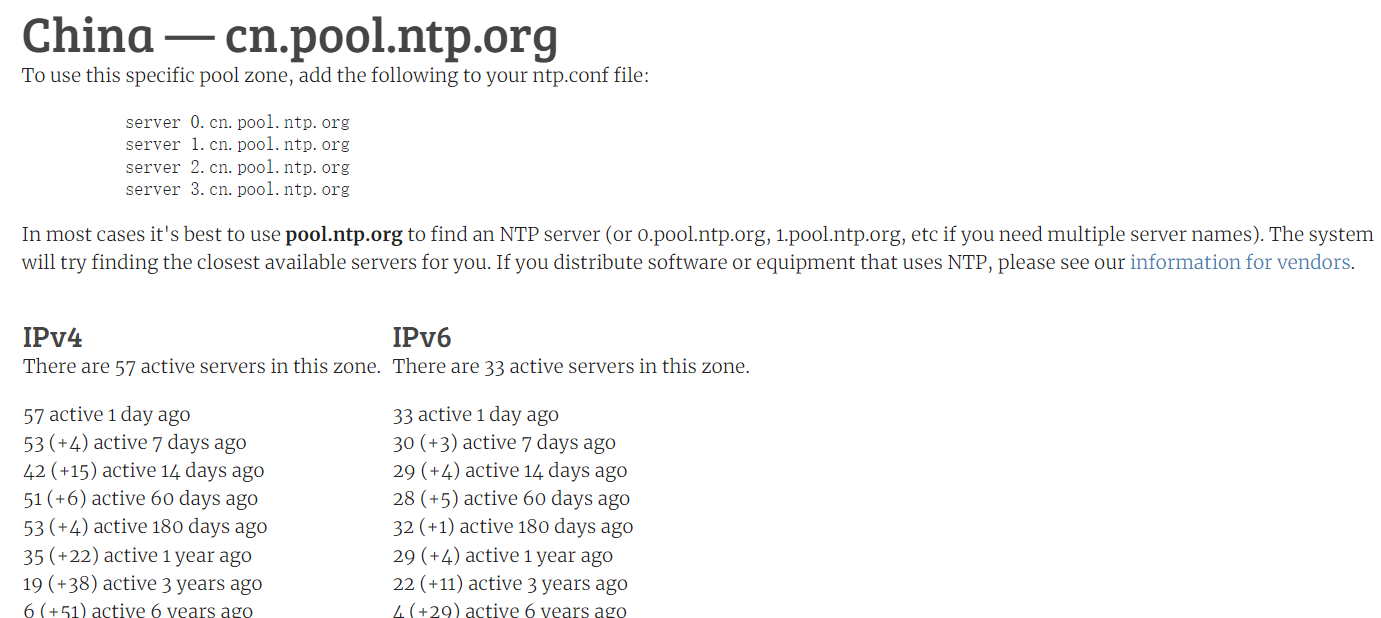
安装完服务器之后,首先到官方 NTP 公共时间服务器池NTP Public Pool Time Servers,选择你服务器物理位置所在的洲,然后搜索你的国家位置,然后会出现 NTP 服务器列表。
3.3在 CentOS 中配置 NTP 服务器
打开编辑 NTP 守护进程的主配置文件,注释掉来自pool.ntp.org项目的公共服务器默认列表,并用类似下面截图中提供给你所在国家的列表替换。(LCTT 译注:中国使用 0.cn.pool.ntp.org 等)
root@shadow ~# vim /etc/ntp.conf
Use public servers from the pool.ntp.org project.
Please consider joining the pool http://www.pool.ntp.org/join.html.
0.centos.pool.ntp.org iburst
1.centos.pool.ntp.org iburst
2.centos.pool.ntp.org iburst
3.centos.pool.ntp.org iburst
server 0.cn.pool.ntp.org iburst
server 1.cn.pool.ntp.org iburst
server 2.cn.pool.ntp.org iburst
server 3.cn.pool.ntp.org iburst
3.4替换网络IP
下一步,你需要允许来自你的网络的客户端和这台服务器同步时间。为了做到这点,添加下面一行到 NTP 配置文件,其中 restrict 语句控制允许哪些网络查询和同步时间 - 请根据需要替换网络 IP。
Hosts on local network are less restricted.
restrict 192.168.250.0 mask 255.255.255.0 nomodify notrap
nomodify notrap 语句意味着不允许你的客户端配置服务器或者作为同步时间的节点。
3.5在 CentOS 中启用 NTP 日志
如果你需要用于错误处理的额外信息,以防你的 NTP 守护进程出现问题,添加一个 logfile 语句,用于记录所有 NTP 服务器问题到一个指定的日志文件 /var/log/ntp.log。
root@ntp ~# cat /var/log/ntp.log
1 Apr 14:16:08 ntpd3676: ntp_io: estimated max descriptors: 1024, initial socket boundary: 16
1 Apr 14:16:08 ntpd3676: Listen and drop on 0 v4wildcard 0.0.0.0 UDP 123
1 Apr 14:16:08 ntpd3676: Listen and drop on 1 v6wildcard :: UDP 123
1 Apr 14:16:08 ntpd3676: Listen normally on 2 lo 127.0.0.1 UDP 123
1 Apr 14:16:08 ntpd3676: Listen normally on 3 eth0 192.168.250.198 UDP 123
1 Apr 14:16:08 ntpd3676: Listen normally on 4 virbr0 192.168.122.1 UDP 123
1 Apr 14:16:08 ntpd3676: Listen normally on 5 lo ::1 UDP 123
1 Apr 14:16:08 ntpd3676: Listening on routing socket on fd #22 for interface updates
1 Apr 14:16:13 ntpd3676: 0.0.0.0 c016 06 restart
1 Apr 14:16:13 ntpd3676: 0.0.0.0 c012 02 freq_set kernel 0.000 PPM
1 Apr 14:16:13 ntpd3676: 0.0.0.0 c011 01 freq_not_set
1 Apr 14:16:19 ntpd3676: 0.0.0.0 c614 04 freq_mode
1 Apr 14:37:34 ntpd3676: 0.0.0.0 0612 02 freq_set kernel 0.439 PPM
1 Apr 14:37:34 ntpd3676: 0.0.0.0 0615 05 clock_sync
10 Apr 08:11:12 ntpd3676: Listen normally on 6 tun0 10.8.0.1 UDP 123
10 Apr 08:11:12 ntpd3676: Listen normally on 7 tun0 fe80::ec42:ee3a:4239:947a UDP 123
10 Apr 08:11:12 ntpd3676: new interface(s) found: waking up resolver
10 Apr 09:18:50 ntpd3676: Deleting interface #7 tun0, fe80::ec42:ee3a:4239:947a#123, interface stats: received=0, sent=0, dropped=0, active_time=4058 secs
10 Apr 09:18:50 ntpd3676: Deleting interface #6 tun0, 10.8.0.1#123, interface stats: received=0, sent=0, dropped=0, active_time=4058 secs
10 Apr 09:18:59 ntpd3676: Listen normally on 8 tun0 10.8.0.1 UDP 123
10 Apr 09:18:59 ntpd3676: Listen normally on 9 tun0 fe80::40c6:1ac6:b8c0:29c1 UDP 123
10 Apr 09:18:59 ntpd3676: new interface(s) found: waking up resolver
root@ntp ~#
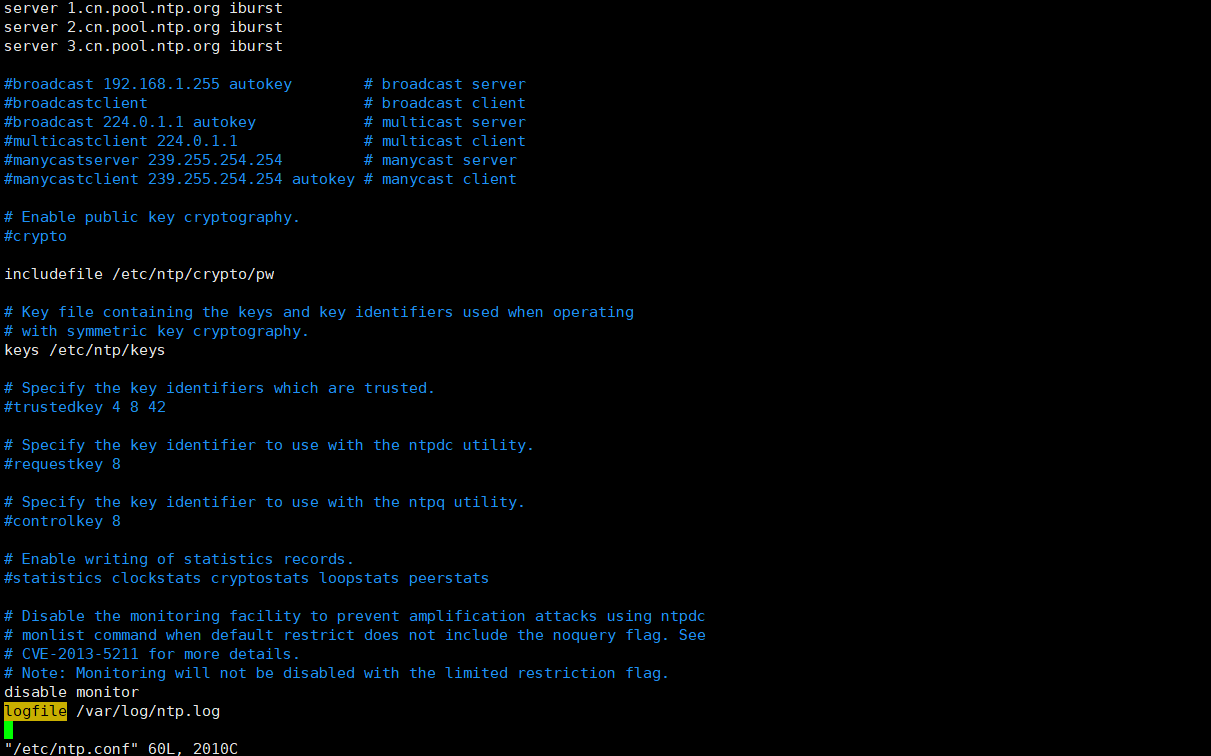
3.6NTP 服务器配置
在编辑完所有上面解释的配置并保存关闭ntp.conf文件后,最终的配置如下图所示:
4.添加防火墙规则并启动 NTP 守护进程
4.1在 Firewall 中开放NTP端口
NTP 服务使用 OSI 传输层(第四层)的123号UDP端口。它是为了避免可变延迟的影响所特别设计的。要在 RHEL/CentOS 7 中开放这个端口,可以对 Firewalld 服务使用下面的命令。
root@shadow ~# firewall-cmd --add-service=ntp --permanent
success
root@shadow ~# firewall-cmd --reload
success
root@shadow ~#
4.2启动NTP服务
在防火墙中开放123 端口之后,启动 NTP 服务器并确保系统范围内可用。用下面的命令管理服务。
root@shadow ~# systemctl start ntpd
root@shadow ~# systemctl enable ntpd
Created symlink from /etc/systemd/system/multi-user.target.wants/ntpd.service to /usr/lib/systemd/system/ntpd.service.
root@shadow ~# systemctl status ntpd
● ntpd.service - Network Time Service
Loaded: loaded (/usr/lib/systemd/system/ntpd.service; enabled; vendor preset: disabled)
Active: active (running) since 二 2022-01-25 16:08:12 CST; 13s ago
Main PID: 7359 (ntpd)
CGroup: /system.slice/ntpd.service
└─7359 /usr/sbin/ntpd -u ntp:ntp -g
1月 25 16:08:12 shadow ntpd7359: Listen normally on 3 eth0 192.168.250.182 UDP 123
1月 25 16:08:12 shadow ntpd7359: Listen normally on 4 virbr0 192.168.122.1 UDP 123
1月 25 16:08:12 shadow ntpd7359: Listen normally on 5 lo ::1 UDP 123
1月 25 16:08:12 shadow ntpd7359: Listen normally on 6 eth0 fe80::941:8a6:6c27:1098 UDP 123
1月 25 16:08:12 shadow ntpd7359: Listening on routing socket on fd #23 for interface updates
1月 25 16:08:12 shadow systemd1: Started Network Time Service.
1月 25 16:08:17 shadow ntpd7359: 0.0.0.0 c016 06 restart
1月 25 16:08:17 shadow ntpd7359: 0.0.0.0 c012 02 freq_set kernel 0.000 PPM
1月 25 16:08:17 shadow ntpd7359: 0.0.0.0 c011 01 freq_not_set
1月 25 16:08:23 shadow ntpd7359: 0.0.0.0 c614 04 freq_mode
root@shadow ~#
5.验证服务器时间同步
启动了NTP守护进程后,用几分钟等服务器和它的服务器池列表同步时间,然后运行下面的命令验证 NTP 节点同步状态和你的系统时间。
root@ntp ~# ntpq -p
remote refid st t when poll reach delay offset jitter
ntp8.flashdance .INIT. 16 u - 64 0 0.000 0.000 0.000
ntp.ams1.nl.lea .INIT. 16 u - 64 0 0.000 0.000 0.000
time.cloudflare .INIT. 16 u - 64 0 0.000 0.000 0.000
*ntp5.flashdance 192.36.143.130 2 u 39 64 1 215.636 -42.721 3.796
root@ntp ~#
root@ntp ~# date -R
Thu, 15 Jun 2023 13:21:49 +0800
root@ntp ~#
6.设置LINUX NTP客户端
6.1编辑客户端/etc/ntp.conf配置文件
如下,在/etc/ntp.conf下增加以下两行语句:
root@mysvn ~# vim /etc/ntp.conf
server 192.168.250.198 iburst
restrict 192.168.250.198 mask 255.255.255.0 nomodify notrap nopeer
root@mysvn ~#
关于相关参数含义的解释,下节专门说明。
6.2重启ntp服务
重启并设置NTP服务开机自启:
root@mysvn ~# systemctl start ntpd
root@mysvn ~# systemctl enable ntpd
Created symlink from /etc/systemd/system/multi-user.target.wants/ntpd.service to /usr/lib/systemd/system/ntpd.service.
root@mysvn ~#
6.3客户端时间同步测试
先查看客户端当前时间:
root@mysvn ~# date
2023年 06月 15日 星期四 13:51:59 CST
root@mysvn ~#
然后与ntp服务器进行时钟同步:
root@mysvn ~# ntpdate 192.168.250.198
执行该命令时出现错误提示:
15 Jun 13:53:38 ntpdate28571: the NTP socket is in use, exiting
然后这样解决:
root@mysvn ~# lsof -i :123
COMMAND PID USER FD TYPE DEVICE SIZE/OFF NODE NAME
ntpd 28501 ntp 16u IPv4 4443896 0t0 UDP *:ntp
ntpd 28501 ntp 17u IPv6 4443897 0t0 UDP *:ntp
ntpd 28501 ntp 18u IPv4 4443902 0t0 UDP localhost:ntp
ntpd 28501 ntp 19u IPv4 4443903 0t0 UDP mysvn:ntp
ntpd 28501 ntp 20u IPv4 4443904 0t0 UDP mysvn:ntp
ntpd 28501 ntp 21u IPv6 4443905 0t0 UDP localhost:ntp
root@mysvn ~# kill -9 28501
root@mysvn ~#
然后再次执行时钟同步命令:
root@mysvn ~# ntpdate 192.168.250.198
15 Jun 13:57:24 ntpdate28601: adjust time server 192.168.250.198 offset 0.000981 sec
root@mysvn ~#
6.4设置定时任务进行时钟同步
这里假设每天晚上1点向NTP服务器同步时间:
root@mysvn ~# crontab -e
no crontab for root - using an empty one
crontab: installing new crontab
root@mysvn ~# crontab -l
00 01 * * * root /usr/sbin/ntpdate 192.168.137.3; /sbin/hwclock -w
root@mysvn ~#